We all love a good messy bun on busy days! AIIR Force stylists Sam and Lauren, aka (@sandltrends), are sharing how to elevate this look with AIIR Professional products and a few simple styling tricks.
The result is a pretty, perfectly “un-styled” bun that still leaves plenty of time for extra ZZZ’s and a morning coffee run. We also have an unexpected finishing touch to take this look from “daytime chic” to “late-night glam”.
This 5-minute bun is a great option for second- or third-day curls, but it also works on hair that has been freshly washed. (Because some days, a blowout just isn’t happening!)
Texture AIIR gives dirty OR clean hair an instant boost of grit, volume and messy texture for a more structured updo. You’ll also need a clear elastic, a hair bungee, a smoothing hairbrush, bobby pins, AIIR Styling Paste and AIIR Shine Spray. Here’s how to get the perfect textured bun.
Step One

Start by creating a center part in your hair and brushing your hair back into a low ponytail. Secure the ponytail at the nape of your neck with a hair elastic or bungee. Sam and Lindsay love using a bungee for thick hair, as this keeps your ponytail much more secure!
Step Two

Use your fingers to gently pull and tease the hair at your crown. For extra volume and grip, spray Texture AIIR all over the top and sides of your head.
Step Three
Now it’s time to focus on the “tail” of your pony (the hair below the bungee). Apply a dab of AIIR Styling Paste to your hands, emulsify the product by rubbing your palms together, and smooth it evenly through your ponytail. This will give you more control and definition while preventing flyaways.
Step 4
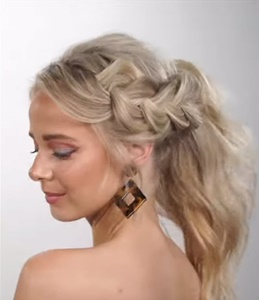
Divide your ponytail into three equal sections and create a basic three-strand braid. When you reach the ends of the hair, secure your braid with a clear elastic.
Step 5

“Pancake” the braid by holding the end in one hand and gently pulling each section up and out with the other hand. Avoid roughing up the braid too much-- the goal is to add body while keeping the hair sleek and smooth.
Step 6

Wrap your braid around the base of your ponytail and pin it into place with bobby pins. (Jumbo bobby pins provide the best hold for thick or heavy hair.) Place each pin into the bun at a 90 degree angle and gently turn the pin to secure the bun against your head.
Step 7

Use your fingers to fluff out the braided bun until you get the look you want. Apply an all-over blast of AIIR Shine Spray for a brilliant, glossy finish.
Step 8

To take this simple style up a notch, get creative with fun accessories-- from your local craft store! Stick-on rhinestones and pearls give this braided bun a playful twist. Ask a friend to apply them to the back of your head, right above the bun. The added sparkle makes this look perfect for photos, a cocktail party or your next event!

How-To: The 5-Minute Messy Bun
Written by Jenny StrebeFeb 20, 2020
Read time 5 min

.png?mw=300&mh=300&as=1)