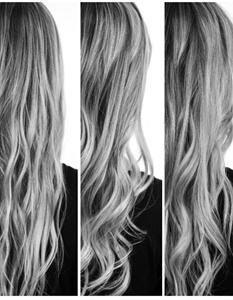

When it comes to haircutting, often the KISS method is the best approach. And, not the old somewhat insulting KISS definition…the update for 2019 is Keep It Successfully Simple! In this shag-influenced loose and whimsical shape, the Sam Villa ArTeam keeps the approach very visual with the use of a slide cutting shear (Sam Villa Artist Series 6” Slide Cutting Shear to be specific) and an “inside-out” cutting motion. To add a splash of excitement to the front view, he adds a wide fringe to bring focus to the model’s beautiful eyes.
Layers:
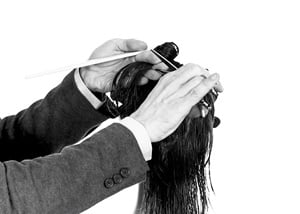
• Find the center point of the crown and take a vertical 1” wide pie-shaped section from that point to the nape.
• Elevate horizontal (90 to the wall) with no overdirection forward or back to follow the natural head shape.
• Float the shear just above the hair so that the tip of the shear is facing away from the head towards the ends of the hair and almost parallel to the hair.
• With a quick half-closing movement (don’t close fully) of the shear and sliding down the hair a few inches, softly remove hair so the shortest point falls just above the occipital.
• Continue this movement to slide down the section in a way to leave the perimeter length intact. Think of a very steep diagonal cutting line from shortest at the crown to very long at the perimeter
• Take another pie shaped section always connecting back to the point in the crown. Don’t worry about taking hair from the previous section. The short piece at the center of the crown and the perimeter length are the two points to be concerned about.
• Continue in the same pattern all the way around the head being cautious not to overdirect forward or back and increasing the elevation slightly as the sections move past the ear and onto the top of the head
• Remember, this is a visual exercise to connect the shortest length in the crown to the longest length at the perimeter with soft slicing movements.
Fringe:
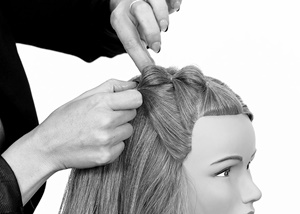
• Find the area that naturally forms the fringe by moving the hair around until the natural parting around the recession appears. If it doesn’t want to part wide enough, just be clear with the salon guest that some redirection of the natural growth will be needed in the blow dry – teach them how!
• Elevate the entire section horizontally (90 to the wall), overdirect everything straight forward, and softly point-cut a curved cutting line that is shortest in the middle to slightly longer at the perimeter with the Sam Villa Artist Series 6.25” Shear.
• With the hair combed into natural fall, refine the perimeter edge
• Introduce additional texture to the fringe by channel cutting pieces with the slide cutting shear
Finishing:
• Add about a quarter size of Redken No Blow Dry Just Right cream throughout the hair.
• Use a diffuser on the Sam Villa Artist Series Professional Blow Dryer and hover over the hair while using the other hand to define the texture to emulate natural air drying.
• Once hair is fully dried, use the Sam Villa Artist Series 2-in-1 Marcel Curling Iron and Wand 1.5” in its wand form to randomly add bend in areas that look straight or flat.
• Take one last look throughout the shape and adjust texture and density with additional “inside-out” techniques like slide cutting, channel cutting, or “pinch and talk”.
“Keep it successfully simple and trust the imperfection of visual cutting. To create today’s texture, a looser approach, as well as a looser mind set, must be adopted,” adds Andrew Carruthers, Education Director for Sam Villa.
Credits: Hair/Sam Villa ArTeam; Photo/Katie Parker; Wardrobe/Amia Serrano; Makeup/Teal Druda.