Source: Courtesy of L’Oréal Professionnel Artist Jess Gonsalves
Popularly known as the “money piece” since it became the color technique trending since 2017, the Perfect Piece has proven to be an easy way to give clients more bang for their buck while also providing incremental profit for stylists. Easily customizable depending on the client, it’s personalization at its finest that can cater to every client’s taste. Here, check out two looks that serve from East to West by L’Oréal Professionnel artists to inspire your next Perfect Piece.

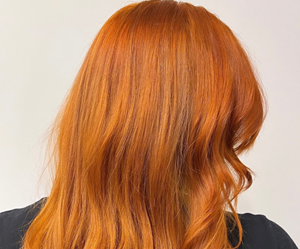
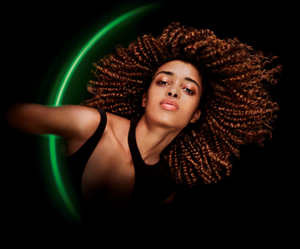
Source: Courtesy of L’Oréal Professionnel Artist Jasmine Lynette
EAST COAST
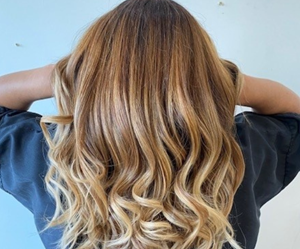
Jasmine Lynette
@jasmine.washington
Washington, D.C.
“D.C. is a very transient city with a very ‘all work, not as much play’ reputation. And so, people are typically a lot busier and don’t want to take time every eight weeks sitting in the salon chair. The Perfect Piece is a great option for this lifestyle because you can book it for a very small amount of time. Most D.C. girls want that instant gratification of color and that front piece is what really brightens everything up to give you the illusion of brighter, blonder hair without having to commit to the maintenance of that all over blonde. Plus, it’s super trendy.”—Jasmine Lynette
Formula
Perfect Piece: Blond Studio 9 + 20-Volume Oil Developer
Balayage: Blond Studio 9 + 30-Volume Oil Developer
Photo Finish: DIA Light 10.01 + 6-Volume DIActivateur
Step-By-Step
- Begin by parting a 1-inch section around the entire hairline.
- From there, thinly slice, air touch, and lightly tease each slice to create a baby soft, Perfect Piece.
- Create your glossy photo finish using DIA Light 10.01 and 6-Volume DIActivateur Developer.

Source: Courtesy of L’Oréal Professionnel Artist Jess Gonsalves
WEST COAST
Jess Gonsalves
@jess.stylist
Santa Barbara, CA
“Ever since moving to the West Coast, I’ve noticed that my balayage services are pretty different from what I performed on the East Coast. My clients here are very into outdoor activities, so a reverse balayage or a lowlight balayage with an express face frame make up the majority of what I do now.”—Jess Gonsalves
Formula
Root: Majirel 5N / Majirel 6.23 Equal Parts + 20-Volume Majicrème Developer
Balayage & Perfect Piece: Platinium Plus + 20-Volume Nutri-Developer
Photo Finish: DIA Light 7.13/ DIA Light 8N Equal Parts + 6-Volume DIActivateur Developer
Step-By-Step
- Begin by applying the Majirel root formula globally.
- Section an inverted triangle at the front hairline for your Perfect Piece.
- Section out a teardrop horseshoe, leaving the front of the hairline out. Then paint by bricklayering large balayage pieces.
- Drop ½-inch sections all the way around the horseshoe and drag down the root formula to the mid-lengths. Repeat this going up the part line.
- For your Perfect Piece, subsection the triangle into two diagonal forward sections.
- Paint subsections with 3D triple points for maximum pop.