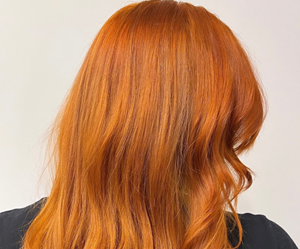
BUTTERY CROISSANT
BY ABBIE ADDOTTA
“This look was inspired by a chic, cool French girl combined with beach vibes. My decision on this specific application was due to her previous highlighting history. I needed a more classic application to break up old lines and achieve maximum brightness.”
-L’Oréal Professionnel Artist Abbie Addotta @abbieaddotta

1. FORMULA - MIXING
Mix equal parts Majimèche Step 1 + Majimèche Step 2 + 30-vol. Majicrème Developer

2. SECTIONING - BALAYAGE APPLICATION
Start by creating a diagonal back aka a “V” sectioning thru back of head. Front left and right sides diagonal back pivoting at the temples into horizontal subsections.

3. PAINT - BALAYAGE APPLICATION
Apply on clean dry hair. Section the front out of the way. Begin with the formula in back with “V” sectioning. Just below the occipital bone- this will vary depending on layering. Take a medium section to create bold pieces through zones 2 & 3 but remain soft in zone 1. Brick lay throughout the back.

4. FORMULA - LOWLIGHT FORMULA
DIA Richesse 7.01/7NB + 6-vol. DIActivateur Developer

5. PAINT - BALAYAGE & LOWLIGHT APPLICATION
Lowlight with a thin veil of Formula 2 between every highlighted section in the back and every other section in the front. Begin in the front on the heavy side. Create soft small pieces around the front of the hairline with Formula 1.

6. PAINT - BALAYAGE APPLICATION
While just behind, using a mix of single, double and triple points throughout the front subsections to bring maximum brightness yet variation. Process under heat for 15 minutes, then let cool. Rinse and shampoo with INOA Post Color Shampoo. Towel dry the hair as much as possible and comb through.

7. RETOUCH FORMULA - GLOSS
Mix DIA Light ½ 9.02/9NV + ½ 10.32/10GV + 9-vol. DIActivateur Developer. Apply the retouch formula with a bowl and brush for accuracy.

8. LENGTHS & ENDS FORMULA - GLOSS
Mix DIA Light ¾ 10.32/10GV + ¼ Clear + 9-vol. DIActivateur Developer. For mid-lengths and ends, the formula should be applied with a bottle.

9. FINISH - REMOVAL & RINSING
Process until your desired tone is achieved. Rinse and follow with your recommended Serie Expert
shampoo and Powermix treatment.

ARTIST TIP
“To achieve this look, tension is key! As well as keeping your insertion point soft.” L’Oréal Professionnel Artist Abbie Addotta @abbieaddotta

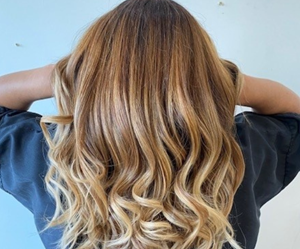
PAVÉ DIAMOND
BY KELLI HOVEY
“There isn’t a single Balayage client I don’t finish with a gloss! It gives my client a customized finish to their color, adds tons of beautiful shine, and helps close down the cuticle.”
- L’Oréal Professionnel Artist Kelli Hovey @khovey

1. FORMULA - MIXING
Formula 1: Freehand Techniques Powder + 40-vol Majicrème Developer

2. FORMULA - MIXING
Formula 2: DIA Richesse ½ 6.13/6BG + ½ 6.01/6NB + 9-vol DIActivateur Developer

3. SECTIONING - QUADRANTS
Section the hair as you would when applying the classic Balayage Technique. *For a more dimensional look, start by sectioning the hair into four quadrants.* In the back section at top of the crown and the control point, take a wide triangle section. This will create depth and softness that will lay on top of the back two quadrants. Within the back two quadrants, take diagonal back subsections. Once you have reached the triangle section at the crown, take horizontal subsections. In the front two sections, take diagonal back subsections.

4. PAINT BALAYAGE APPLICATION - FORMULA 1 + 2
After sectioning, start your color application in the back. Alternate each section with Formula 1 and Formula 2 (lowlight). Take horizontal subsections in a triangle section at the top of the crown and continue to alternate with Formula 1 and Formula 2. Continue to use Formula 1 and Formula 2 in the front two sections. To create extra pop around the face, paint Formula 1 away from the face along the hairline.

5. FORMULA - MIXING
DIA Light ¼ 9.01/9NB + ½ 10.12/10BV + ¼ Clear + 9-vol DIActivateur Developer

6. FINISH - GLOSS & RINSE
Once you have reached your desired brightness, begin to rinse your Balayage client with your targeted L’Oreal Professionnel Serie Expert shampoo. Apply Formula 3 and let it process for 10 minutes. Rinse and repeat with Serie Expert Shampoo and follow with a Powermix Treatment.

ARTIST TIP
“To soften old color lines to the next level, try using your lowlight or a separate formula underneath the freshly painted Balayage piece. Use your Balayage brush at a horizontal stroke to keep your pieces clean.” L’Oréal Professionnel Artist Kelli Hovey @khovey

BUBBLY CHAMPAGNE
BY SEBASTIAN LANGMAN-KIRTLEY
“My model only gets her hair colored twice a year, so keeping it soft was a priority. Diagonal back sectioning creates brightness around the face with diffused pops of lightness throughout the interior, keeping the look low maintenance. I wanted to accent her peaches and cream skin tone with a warm opalescent gloss.”
- L’Oréal Professionnel Artist Sebastian Langman-Kirtley @sebastiancolorist

1. SECTIONING - PREP
Begin by dividing the head from front to back. Clip away the crown in a triangular subsection. Use 1-inch wide diagonal back subsections working from the nape towards the crown.

2. FORMULA - MIXING
Multi-Techniques Powder + 30-vol. Majicréme Developer

3. PAINT - BALAYAGE APPLICATION
Apply Formula 1 with the traditional multi-point application, painting the surface of zones 1 and 2 with full saturation in zone 3.

4. PAINT - BALAYAGE APPLICATION
When applying the crown, move the hair around and let the natural growth patterns dictate sectioning. Divide the front using the natural part as a guide. Use 1 -inch diagonal back subsections, painting double points at the hairline and multi-points toward the interior. Reduce the width of the subsection to 1/2 inch on either side of the part. Process to level 9-10.

5. FORMULA - MIXING
DIA Light 8/8N + 9-vol. DIActivateur Developer

6. RETOUCH - GLOSS & TREAT
Leaving out the entire hairline, apply Formula 2 as a shadow root feathering lower in the back. Process for 5 minutes.

7. FORMULA - MIXING
DIA Light 10.21/10VB + 9-vol DIActivateur Developer with a 2 inch ribbon of 7.43/7CG
8. FINISH - REMOVAL & RINSING
After rinsing the shadow, apply Formula 3 globally, roots to ends, leaving out the front hairline until the last minute. Shampoo with Serie Expert Blondifier Illuminating shampoo and masque.

ARTIST TIP
“When I’m working with wide subsections, I always triple check the product saturation on the bottom third of the hair to make sure the ends are bright and beachy.” L’Oréal Professionnel Artist Sebastian Langman-Kirtley @sebastiancolorist
Photography: Courtesy of L’Oréal Professionnel